Fret Board Taper Jig - Table Saw Method.

Got a new way of doing something? Or maybe an old method that needs some clarification.

Moderators: kiwigeo, Jeremy D

Post Reply
User avatar
Allen
Blackwood
Posts: 5251
Joined: Thu Oct 11, 2007 5:39 pm
Location: Cairns, Australia
Contact:

Fret Board Taper Jig - Table Saw Method.

Post by Allen » Sun Nov 01, 2009 5:30 pm

Cutting an accurate taper on a fret board, so that the fret slots are dead square to the centre of the board is a walk in the park with the use of a little jig that takes about 15 minutes to make. I do this on a table saw, but with a fine blade you should be able to do this on a band saw as well, though you'll most likely need to clean up the edges.

I first saw this idea on Sylvan Wells site, but alas that resource is only available to those who want to fork out some cash nowadays. But the spirit of the ANZLF is in sharing information, though you can always buy me a beer should you find this useful. :lol:

To start off with the fret board needs to be squared up (no taper to it the way some rough cut boards arrive) and you will need your fret slots cut. Do that in whatever manner that suits you.

This demo show me doing a concert size ukulele board, but the principle is the same for any type of board. My fret board is 34 mm wide at the nut, and a maximum width of 48 mm. I cut the board no more than 10 mm longer than what I need, and exactly 48 mm wide.

Now comes the jig and a little math. As my nut is going to be 34 mm and the board at its maximum width is 48 mm, there is a difference of 14 mm between the two. This tells me that I will need a 7 mm taper cut on each side of the board starting at the nut and finishing off at nothing at the soundhole end of the fret board.

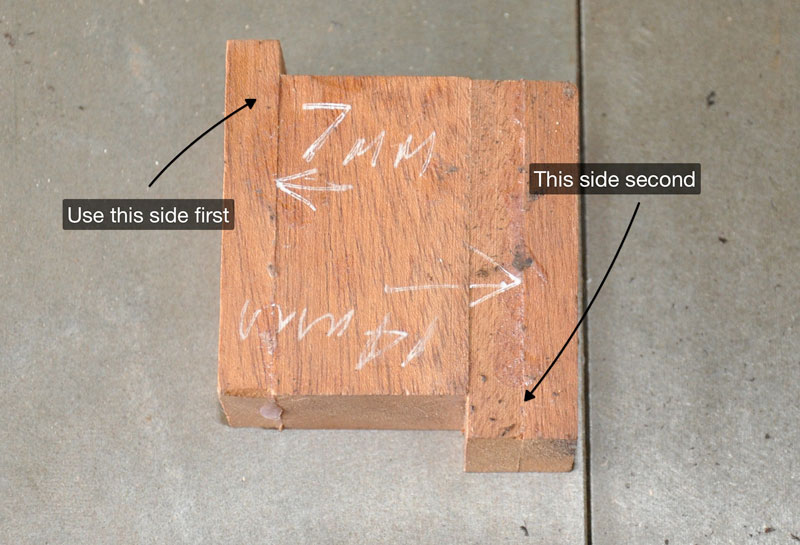
The jig is made by cutting a piece of wood that you dimension either on the table saw, drum sander, or hand plane to be exactly 7 mm thick and long enough to cut a few lengths to build the jig.
Image

A picture is worth a thousand words, so this will make it a little clearer. I have a block of wood that I laminate one piece of the 7 mm wide material onto one side, and 2 layers of it making 14 mm on the other.

NOTE: The total width of this jig must be less than the width of your fret board, or you will end up cutting it on the first pass, and rendering it useless.

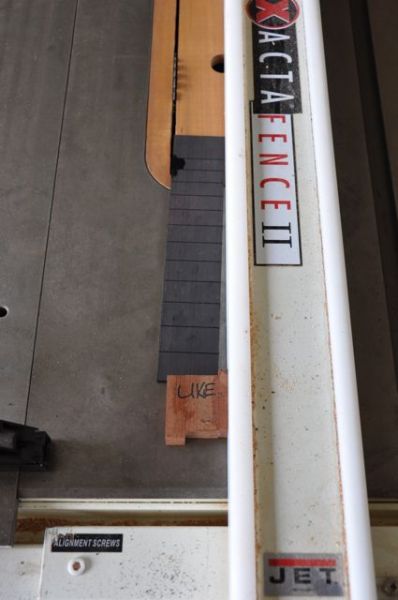
Now in use, you set the fence on your saw to be exactly the width of your fret board. Place the soundhole end of the board closest to the blade, them slip the narrow end of the jig between the fret board and fence for the first cut.
Image

Run it through the saw and you will get a perfect taper starting at the sound hole end of nothing removed, to the nut with the 7 mm removed.

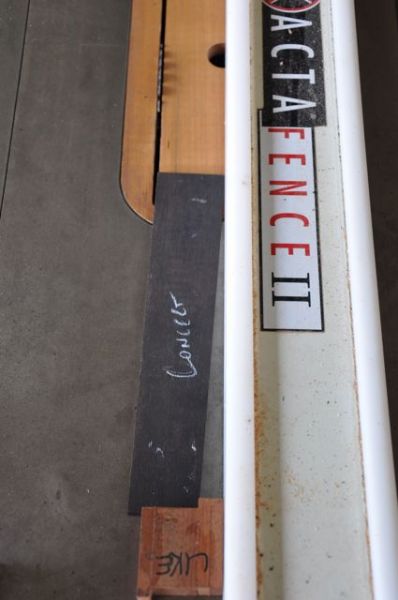
Then just turn the board over to cut the other side. DO NOT TURN IT END FOR END. Now use the 14 mm wide part of the jig to space the fret board out from the fence.
Image

Same deal with running through the saw, and your done.

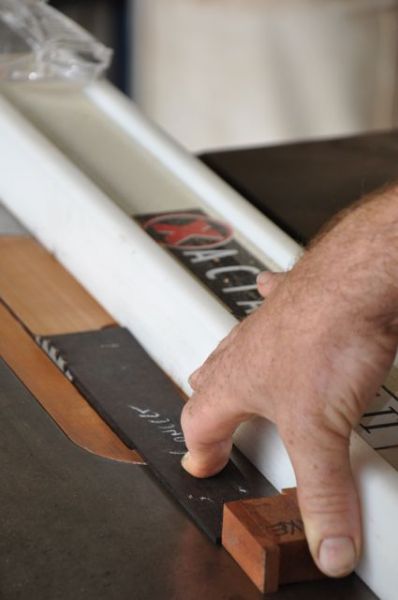
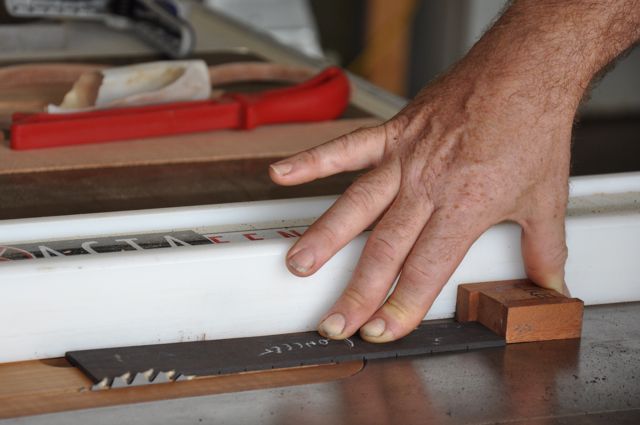
Heres a couple more shots to show you how I hold the jig and fret board to make the cut. You need to keep in mind that there is a saw blade there without a guard, so be mindful of your fingers, and I always stand to the side of the blade, so if something does come flying back I'm not in the direct line of fire. I also have the blade set very low so as to minimise the chance of sticking my fingers into it.
Image
Image

You can make a taper jig like this to suit any taper that you want. Just do the math as in my example and knock together a few for different instruments.
Allen R. McFarlen
https://www.brguitars.com
Facebook
Cairns, Australia

User avatar
Mark McLean
Blackwood
Posts: 1124
Joined: Thu Apr 10, 2008 2:03 pm
Location: Sydney

Post by Mark McLean » Sun Nov 01, 2009 8:39 pm

Allen, that is the kind of jig that I love the most. Simple, ugly, totally effective and cheaper than chips. Perfect. Thanks.
Mark

User avatar
Allen
Blackwood
Posts: 5251
Joined: Thu Oct 11, 2007 5:39 pm
Location: Cairns, Australia
Contact:

Post by Allen » Sun Nov 01, 2009 9:40 pm

Ugly. :shock:

I'm got to send it down to Craig and get some inlay on it.
Allen R. McFarlen
https://www.brguitars.com
Facebook
Cairns, Australia

Hesh1956
Blackwood
Posts: 1418
Joined: Thu Sep 27, 2007 9:58 am

Post by Hesh1956 » Sun Nov 01, 2009 11:56 pm

Very well done Allen!

Joe Sustaire
Myrtle
Posts: 92
Joined: Sun Nov 23, 2008 1:23 am
Location: Talihina Oklahoma
Contact:

Post by Joe Sustaire » Mon Nov 02, 2009 12:18 am

Slick and simple Allen, even I can afford that jig!
We'll, maybe not the custom inlay you're planning for it. :D

Joe
The only safe thing to do, is to take a chance! Mike Nichols

User avatar
Lillian
Blackwood
Posts: 1702
Joined: Fri Sep 28, 2007 10:31 pm
Location: New Mexico, USA
Contact:

Post by Lillian » Mon Nov 02, 2009 2:35 am

Nicely done Allen. I think I can manage that one. I love simple.


Joe, no worries. Craig just uses bits and pieces of stuff he has laying around to make things like this. viewtopic.php?t=192 The caliper is about halfway down.

User avatar
Nick
Blackwood
Posts: 3639
Joined: Thu Feb 26, 2009 11:20 am
Location: Christchurch, New Zealand
Contact:

Post by Nick » Mon Nov 02, 2009 5:34 am

Nice Job Allen,thanks for posting.
A highly technical piece of kit there, just the sort of jig I like. A "tree of life" inlaid anlong the length of that puppy & maybe an Abalone border should give it that "all class" look :wink:
"Jesus Loves You."
Nice to hear in church but not in a Mexican prison.

User avatar
Allen
Blackwood
Posts: 5251
Joined: Thu Oct 11, 2007 5:39 pm
Location: Cairns, Australia
Contact:

Post by Allen » Mon Nov 02, 2009 6:21 am

Maybe some rope binding to go with the Ukulele :lol:
Allen R. McFarlen
https://www.brguitars.com
Facebook
Cairns, Australia

User avatar
Craig
Admin
Posts: 1090
Joined: Wed Sep 26, 2007 10:08 am
Location: N.S.W. in the bush

Post by Craig » Mon Nov 02, 2009 8:25 am

Thanks for this Allen. Simple and affective . I'll be puting it to use very shortly . I hadn't seen this jig before . Haven't got a decent table saw so I'll try it on the bandsaw. I'll check that it's having one of it's "good days" first though , and not doing the wandering blade thing .

The inlay beautification shouldn't take to long as I'm becoming quicker with each jig I make :wink: :wink: :lol:
Craig Lawrence

Joe Sustaire
Myrtle
Posts: 92
Joined: Sun Nov 23, 2008 1:23 am
Location: Talihina Oklahoma
Contact:

Post by Joe Sustaire » Mon Nov 02, 2009 11:13 am

Thanks Lillian for that link to Craigs tool making. That is some fine work Craig!
Must be a pretty magical shop!

Joe
The only safe thing to do, is to take a chance! Mike Nichols

User avatar
Allen
Blackwood
Posts: 5251
Joined: Thu Oct 11, 2007 5:39 pm
Location: Cairns, Australia
Contact:

Post by Allen » Mon Nov 02, 2009 6:19 pm

It's a good day indeed when I can impress Craig with a tool or jig.:D

My bandsaw wouldn't do a very good job of it. I'd need to cut it oversize just a bit, then shoot the edges with the plane to clean it up. Not a big deal to factor in if that is going to be the plan.
Allen R. McFarlen
https://www.brguitars.com
Facebook
Cairns, Australia

User avatar
Taffy Evans
Blackwood
Posts: 1038
Joined: Wed Apr 30, 2008 6:54 pm
Location: Charters Towers North Queensland

Post by Taffy Evans » Tue Nov 03, 2009 10:59 am

Thanks Allen, I just binned the jigs I was using, or more often not using, and going for this idea. Good one thanks.
Taff

Pappy Green
Beefwood
Posts: 26
Joined: Sat Feb 26, 2011 5:24 pm

Re: Fret Board Taper Jig - Table Saw Method.

Post by Pappy Green » Sun May 13, 2012 2:44 pm

Alan I was just discussing this with Allan H here in Townsville and he said "why don't you look on the forum". Brilliant in its simplicity.

thanks

Brett

User avatar
Allen
Blackwood
Posts: 5251
Joined: Thu Oct 11, 2007 5:39 pm
Location: Cairns, Australia
Contact:

Re: Fret Board Taper Jig - Table Saw Method.

Post by Allen » Sun May 13, 2012 4:19 pm

Thanks Brett. When Micheal saw it he was sold too. And that's not easy to do with him. That guy has forgotten more about woodwork than I think I'll ever know.
Allen R. McFarlen
https://www.brguitars.com
Facebook
Cairns, Australia

simso
Blackwood
Posts: 1769
Joined: Mon Apr 25, 2011 10:36 pm
Location: Perth WA

Re: Fret Board Taper Jig - Table Saw Method.

Post by simso » Sat Jul 07, 2012 11:11 am

That would look sensational with some fancy inlay, it saids basic is good and works but just in case you doubted me, heres some "bling"
Steve
Master of nothing,

Do your own repairs - http://www.mirwa.com.au/How_to_Series.html

User avatar
Clancy
Blackwood
Posts: 621
Joined: Wed Dec 17, 2008 10:26 am
Location: Canberra

Re: Fret Board Taper Jig - Table Saw Method.

Post by Clancy » Sun Oct 21, 2012 9:00 pm

Had a few fingerboards to cut today so I decided to give this little jig a try-out on my 'well behaved' bandsaw.
I had to do a bit of setup first.
The fence needed to be extended out front & back as did the table surface.
So I added on a straight piece of Tassie Oak & some mdf scrap and all was ready.

Since the bandsaw doesn't like to start a cut on the corner of a board, I had to swap the jig to the leading end.
This way the cut starts inside the board and exits at the corner - just watch your fingers & use push sticks etc.

Results were excellent!
Thanks Allen.
21102012067 (Medium).jpg
Craig
I'm not the sharpest tool in my shed

User avatar
Dominic
Blackwood
Posts: 1098
Joined: Thu Jan 10, 2008 8:58 am
Location: Canberra

Re: Fret Board Taper Jig - Table Saw Method.

Post by Dominic » Tue Oct 30, 2012 1:14 am

I'd happily make that cut on the bandsaw but that jig on a table saw is just dangerous. Allen's pick shows a saw with no splitter or riving knife and using a hand and not a push stick. If that fingerboard catches on the rear edge whose ever hand is pushing it through gets dragged right into the blade. You would not want people to copy that, cut their hand off and then sue the forum for publishing unsafe work practices.
Cheers
Dom
You can bomb the world to pieces,
but you can't bomb the world to peace!

User avatar
Kim
Admin
Posts: 4372
Joined: Wed Sep 26, 2007 8:32 pm
Location: South of Perth WA

Re: Fret Board Taper Jig - Table Saw Method.

Post by Kim » Tue Oct 30, 2012 9:47 am

Dominic wrote: You would not want people to copy that, cut their hand off and then sue the forum for publishing unsafe work practices.
Cheers
Dom
As much as we care about the safety and well being of our members Dom, the standard of safety which they choose to practices whilst undertaking task which bring them into contact with machinery, chemicals and other hazards that present risk of personal injury remain strictly a matter for their own discretion.

From the ANZLF Preamble:
The provision of this service does not imply any form of responsibility for those choosing to use this service. Use of this service should not be viewed in such a way that could give rise to the expectation that some form of commitment has been made to the user by those providing it. Rather, this forum should be seen as a service that is provided to the user 'free of charge', and in that, free of any form of obligation to the user.
As administrators of an internet forum the only thing we can add is a heartfelt plea for people to 'please', think about your own safety and the risks involved before undertaking any activity in your shed and be careful in everything you do.


On a brighter note than us group of guitar playing woodworkers focusing on our potential to become amputees, I though offering a safer alternative would be a nice touch for this discussion..If there are safer ways to do things we should take them...even if they can be fiddely things..at least you'll still have things to fiddle with.

Presenting: The Grr-Ripper :D ( Gotta luv that apple pie name)


youtu.be/

I have one of these (should have two for ripping longer stock ), here's my review:

It's a bit of mucking around setting the bloody thing up for each cut and it does have its limitations, but it works well at what it does and is really good for thin and narrow stuff.

Cheers

Kim

User avatar
charangohabsburg
Blackwood
Posts: 1818
Joined: Sat Oct 16, 2010 1:25 am
Location: Switzerland

Re: Fret Board Taper Jig - Table Saw Method.

Post by charangohabsburg » Tue Oct 30, 2012 11:34 am

First of all: Craig, that's a smart bandsaw adaption of Allen's smart tablesaw idea, Thanks to both of you! I also like the table extension, it is simple and looks enough reliable. 8)

---

Good point Dom, except your last sentence. I agree with Kim that a forum or forum user can't be responsible for any reader's safety. Of course it would be ideal if we all would be perfect and never would post a picture that shows less than optimal working conditions of any kind. But it is a good thing to be in a forum and to discuss safety issues and/or pictures that may (or may not) scare us.


And now:
I just can't believe it! No riving knife installed:
norivingknife.gif
norivingknife.gif (66.3 KiB) Viewed 35486 times
Oddly enough, it seems that the splitter had been removed by the "safety" device demonstrator, you can see empty slot for the splitter in the red insert plate.

This will probably not be an issue as long as the stock being cut has parallel faces. But if the face on the left of the blade (in cutting direction, seen from the operator) is not parallel to the fence and blade there remains the possibility the workpiece is going to take a journey through the shed, slapping that bldy "safety"-device in the operator's face or, if he is lucky just through the next window, door or wall.

I just don't get the point why someone would remove the splitter on a table saw (I assume that Allen's tablesaw never had one). Do I miss something? Or is it just for the additional adrenaline kick if one can't afford to go bungee jumping? Image
Markus

To be stupid is like to be dead. Oneself will not be aware of it.
It's only the others who suffer.

Post Reply

Who is online

Users browsing this forum: No registered users and 3 guests