Pore Filling 101
Pore Filling 101
After seeing a recent discussion of pore filling on the OLF, I decided to try something different from my usual Epoxy fill method. Epoxy works great, but it's really messy, and isn't the most user friendly thing that I've ever done. As I was just about to fill the pores on this current East Indian Rosewood OM, this was going to be the perfect opportunity. It has huge pores to fill, and with the epoxy I'm pretty sure that it would take 3 sessions, with at least 24 hours dry time between each round.
To start with, I sanded the body back to P180 grit dry, then gave it a good vacuum and inspection. As I suspected, this was going to take some work to get a nice smooth surface. There were also a few small gaps around the purflings. Nothing to be concerned about, but they would need to be filled.
I separated an egg and saved the yolk for my breadfast omelette. Then, not really having a clue about how to tackle this, I thought that something similar to the way you fill during French Polishing, would perhaps work.
I took a small pad of 180 grit sand paper, (it was fabric backed, but wet and dry would work as well) and dunked it in the egg white, then started to sand the surface in a circular motion. Just doing a small area at a time. I worked up a bit of a slurry that was a nice dark maroon and stopped sanding once it started to dry out. I found that if I kept sanding the fill would start to ball up and pull out of the pores. Heres what it looked like when I move onto the next section.
EDIT - As I've had some feedback about this procedure I'm going to revise the choice of grit for sanding to something finer. It will depend on the type of wood, and how hard it is, but you won't go wrong by using something in the range of P600 or micro-mesh. You'll need to be the judge of what's appropriate.
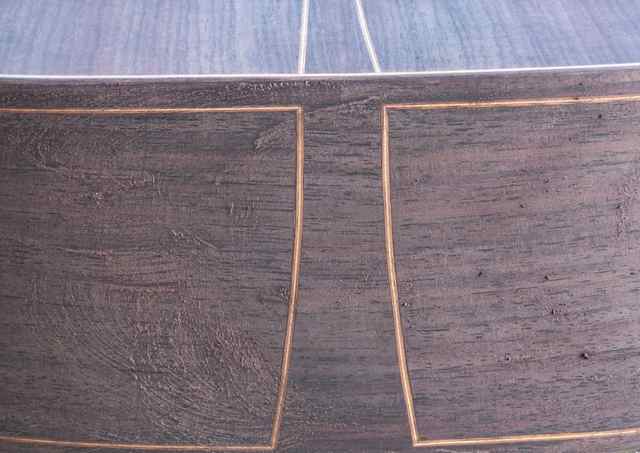
The egg white dries quite quickly and I found it easy to control where it was spread. It's much more difficult with epoxy to keep it away from the spruce top.
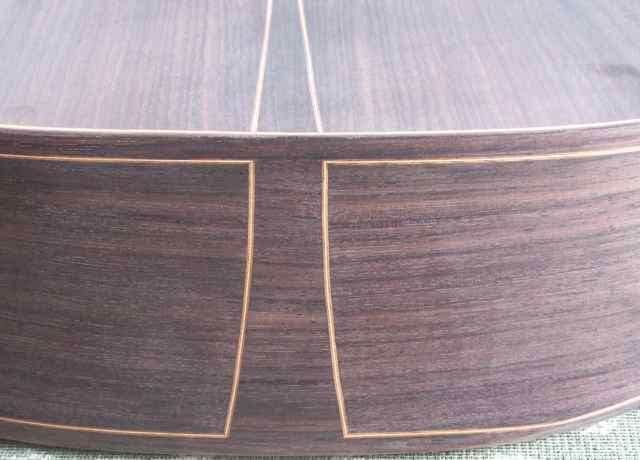
This is the second time around for filling this guitar. The first time around got the surface almost perfect. It just needed a few small areas touched up.
Here's an example of an off cut from the same wood the sides are made from to give you an idea of the amount of filling that was required.
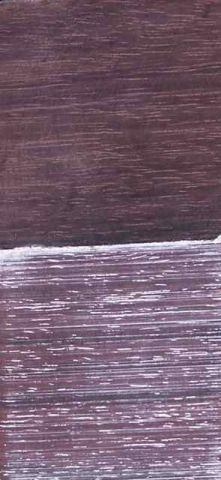
The top section has one pore filling session with the egg white. The bottom section was pore filled with chalk powder and egg white rubbed in with my finger. I force dried both sections with an blow drier, and the entire process took under 5 minutes. The top is pretty well filled. There are only a couple very slight low spots in the deepest pores. One more session would take care of them for sure.
This is going to be the way I pore fill from now on. It's cheap, fast, easy to control and non toxic. The wood doesn't take a dark cast as you can get with some woods under epoxy as well.
Last edited by Allen on Mon Jul 21, 2008 5:41 pm, edited 1 time in total.
Allen,
Thanks for this post, egg white presents a very interesting and appealing alternative in every respect but I do have one question.
With epoxy, as it is not so much a 'wet' fill, insomuch that it is worked into the grain and then sanded off when dry, there is no real issue with colour transferal. For instance to my mind, in the example above, there is the potential for the purple dye from the EIR to stain the lighter coloured woods of any bindings and trim to a pink or light plum colour which would diminish the contrast.
If you found any level of staining unattractive, how would you prevent this from happening when applying egg white slurry with 180 grit abrasive?
Cheers
Kim
I just sanded back the body of the OM, and the staining didn't penetrate the koa-maple-koa binding at all. East Indian Rosewood has been the worst wood for color bleeding that I've come across. If this is the results we can expect for the worst case scenario, then other woods should be a treat.
I don't know what would happen with the white fiber ones. I think that they're going to react about the same. I haven't had a problem with staining on them before unless I wiped the rosewood with some solvent. Then the color bleeds out like nobodies business.
pore filling
Allen, thank you very much for posting this.
Cheap, low tech, non toxic and by the look of it, the best method around.
i'll try it
Cheap, low tech, non toxic and by the look of it, the best method around.
i'll try it
Re: Pore Filling 101
Allen
In a few weeks time I expect to get to the pore fillnig part of my next build - an EIR and Redwood OM.
When I watched your excellent video of epoxy pore fill, it reminded me of this tute. This appeals to me becasue it sounds pretty easy and wouldnt have the scary potential of Kims epoxy experience.
You seemed to think then it was the way you would go for all guitars, henceforth
Do you still use this method in general or was the video using epoxy for a particular reason?
Is anyone else using this method?
Or do you all use epoxy on EIR???
Cheers
RIchard
Richard
- Bob Connor
- Admin
- Posts: 3126
- Joined: Mon Jul 09, 2007 9:43 pm
- Location: Geelong, Australia
- Contact:
Re:
I've added a wood stain to it before to darken Mahogany Dom. Worked fine but you have to be very careful not to sand through it. Don't ask me how I know this.Dominic wrote:Allen, Cool. I imagine you can add colour if you want. I would be interested to see if it works on lighter coloured wood and whether it would work on all types of wood.
Dom
If you are spraying I reckon a better proposition is to add stain to the laquer. (I did this recently and it was a lot less painful than colouring the Z-poxy.
Regards
Re: Pore Filling 101
I use epoxy on everything. I prefer the way it "pops" the grain. And there is no shrink back whatsoever.
Re: Pore Filling 101
OK, Allen thanks for that. I'll keep the eggs for the banana smoothies.
Good luck with your impending visitor Yasi. Stay safe!
Cheers
Richard
Good luck with your impending visitor Yasi. Stay safe!
Cheers
Richard
Richard
Re: Pore Filling 101
I'm going to be finmishing my guitar soon, and want to French Polish it. Is this technique applicable to that finish?
I'm a bit confused regarding the need for pore filling....I'm guessing from what I've read that Qld Maple needs it....
Does this, or the epoxy method lend itself better....Amine blush seems to be associated with lacquer finishes, but does it affect FP ones?
Thanks...
Nick
I'm a bit confused regarding the need for pore filling....I'm guessing from what I've read that Qld Maple needs it....
Does this, or the epoxy method lend itself better....Amine blush seems to be associated with lacquer finishes, but does it affect FP ones?
Thanks...
Nick
I wish I was half the man my dog thinks I am....
Cheers,
Nick
https://www.facebook.com/pages/DMI-hand ... 744?ref=hl
Cheers,
Nick
https://www.facebook.com/pages/DMI-hand ... 744?ref=hl
Re: Pore Filling 101
If you don't mind me asking, where did you read that advice Nick?nnickusa wrote:Amine blush seems to be associated with lacquer finishes ..Nick
Cheers
Kim
Re: Pore Filling 101
Most of the Qld. Maple that I've used would require a moderate amount of pore filling. It's certainly not near as bad as say Indian Rosewood.
Amine blush would be detrimental to all top coats.
If you are going the French Polish route, you may consider other pore filling techniques. I'm no expert on French Polish, but I know the pumice slurry method works pretty well. I've done several samples up for the classes I teach to show students the difference in pore filling and not, as well as the different finishes themselves on identical sample boards.
Re: Pore Filling 101
Kim, there seem to be refrences in posts here refering to the phenomenon, but I really am trying to figure out 1. what it is, and 2. would it affect a FP finish, tho Allen answered that....
Allen, would you have photos of the differences?
I saw once posted here a different method than pumice, using wet/dry paper, but I can't find the darned thing when I'm searching--well, yet...
Also haven't found pumice, but haven't looked too too hard....
I am at the stage to start sanding the body and neck back for finishing, so I expect to be asking questions....I'm going to follow the process shown in the link to millburn guitars http://www.milburnguitars.com/fpbannerframes.html that was kindly posted previously...
Now, here's a guitar I have...Old Ibanez 12-string, that has hundreds of bubbles in the finish, would this be the result of poor pore filling?
I wish I was half the man my dog thinks I am....
Cheers,
Nick
https://www.facebook.com/pages/DMI-hand ... 744?ref=hl
Cheers,
Nick
https://www.facebook.com/pages/DMI-hand ... 744?ref=hl
Re: Pore Filling 101
Sorry, no photo's.
You can do the same thing with sandpaper to make the slurry. I've done that when using oil finishes. Also with egg whites. Had a class of 14 teenagers do the process to their ukes using the Danish Oil and sandpaper method, and they managed to pull it off, so it's not all that difficult.
There will be lot's of places that you can get pumice from. It's not expensive and a little goes a very long way. Certainly StewMac will have it as I'm guessing you are in the US.
Pretty difficult to tell what the craters are from in your photo. Might be pores, and it could also be several other issues related to the application of the finish.
Re: Pore Filling 101
Thanks Allen, not in the US, Byron Shire, NSW....I'm going up to the Gold Coast today to get my big dough mixer in for repairs....
There's a big Bunnings at Nerang. Might stop in there?
Else I might try the wet/dry route. What grit did your sudents use?
There's a big Bunnings at Nerang. Might stop in there?
Else I might try the wet/dry route. What grit did your sudents use?
I wish I was half the man my dog thinks I am....
Cheers,
Nick
https://www.facebook.com/pages/DMI-hand ... 744?ref=hl
Cheers,
Nick
https://www.facebook.com/pages/DMI-hand ... 744?ref=hl
Re: Pore Filling 101
We used P400 wet and dry paper.
In Australia a good place to get pumice has been Goods & Chattels. Top notch service. They do mail orders too.
Re: Pore Filling 101
Nick,
Pumice pore filling is covered by Milburn in their tutorial. I source my pumice from Lee Valley....its their 4F grade pumice. Pumice pore filling works but like FP it takes a bit of practise. Biggest problem is getting too much shellac/pumice/wood fibre build up....the stuff goes hard before you can work it into the pores and has to be sanded off. The trick is to work small areas at a time. Something else to watch out for is over working an area and bleeding out colour from woods such as Indian Rosewood...this leads to a blotchy end result.
Ive used the egg white method and have had success with 320 grit sand paper.
Martin
Re: Pore Filling 101
Cheers Martin,
I've got some different coloured shellacs, pumice and rottenstone coming from LMI. Not for the dread, but I've a project in mind for which I'd like to get a close aproximation to Ibanez' old Antique Violin finish, and a clear blond, orange and brown combination of shellacs might just do it. I also plan on trying the brown on some scraps to see what it would look like on blackwood...
Jeez, there's alot to think about in this game, but I'm loving it
I wish I was half the man my dog thinks I am....
Cheers,
Nick
https://www.facebook.com/pages/DMI-hand ... 744?ref=hl
Cheers,
Nick
https://www.facebook.com/pages/DMI-hand ... 744?ref=hl
Re: Pore Filling 101
Hi Allen, Did you seal the wood with shellac befor the pore fill or just go to the bare wood? Once the pores where filled did you do anything else before you starte spraying? What did you finish the guitar with?
Thanks
Richard
Thanks
Richard
Re: Pore Filling 101
Nothing before pore filling. Depending on the wood it will take usually 2 sessions, but I've had some that will take as many as 4 sessions when the pores are like craters on the moon.
Finish on all my instruments is Mirotone 3220 gloss or their satin. I think the number might be 3222.
- Francis
- Myrtle
- Posts: 74
- Joined: Sat May 28, 2016 1:44 am
- Location: Kingstone, Hereford. UK
- Contact:
Re: Pore Filling 101
Regarding colour bleeding - apply a coat of shellac to the lighter bindings first to act as a barrier. Just sand off later at a dry stage.
-
- Gidgee
- Posts: 1
- Joined: Wed Dec 27, 2017 12:41 am
Re: Pore Filling 101
Thanks for posting....Looks like a great idea
Who is online
Users browsing this forum: No registered users and 2 guests