Bending forms and mods
Hey, In a recent post it was suggested I show some pics of the mods I have made to my heat blanket bender.
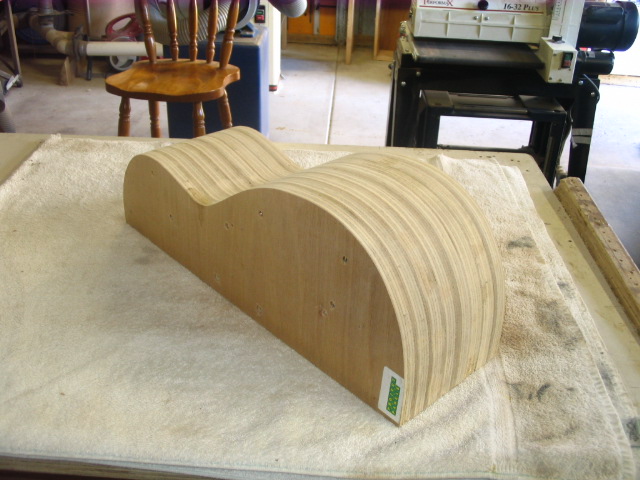
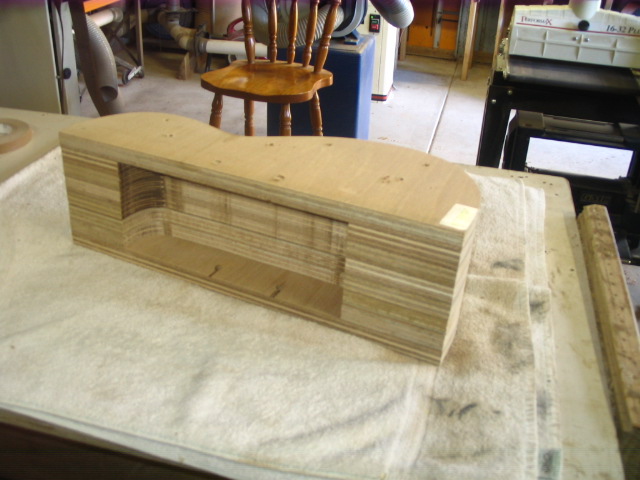
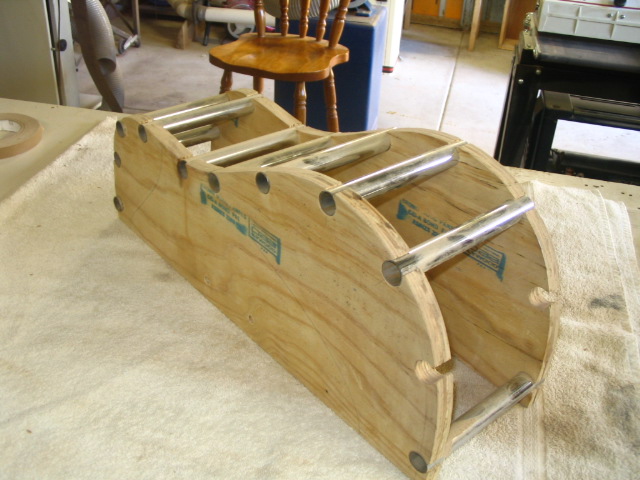
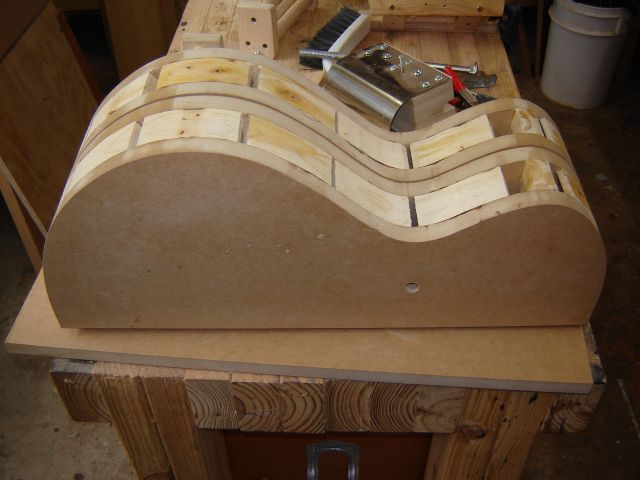
First is a pic of the new solid bending form I made for an MJ. It uses the 4 off-cuts from the mold I made and I added strips of pine 1x2. I made the two halves and joined them afterwards because that was easy for me given my tools and i didn't want to cut up more mdf. But you could easily just make it out of 8 layers of mdf. I have made the form to over bend the side slightly.
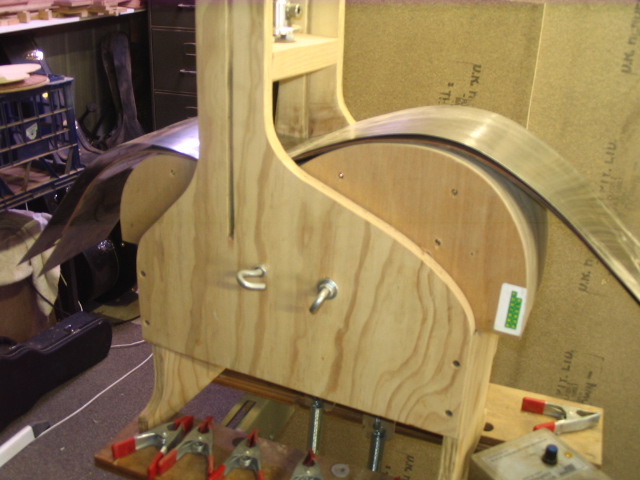
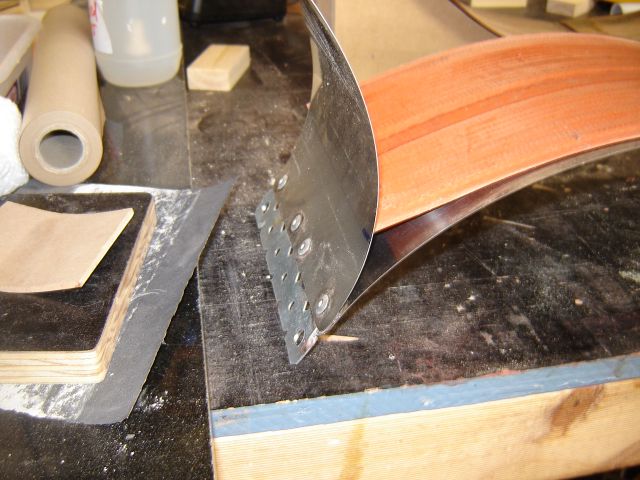
My SS slats for bending are joined at the tail end and I added a galvanised strip between the two slats so the wood and blanket have room to slide all the way in. On the open end there is another gal strip only on the top slat. I have drilled holes in the gal strips so i can attach springs or turnbuckles.
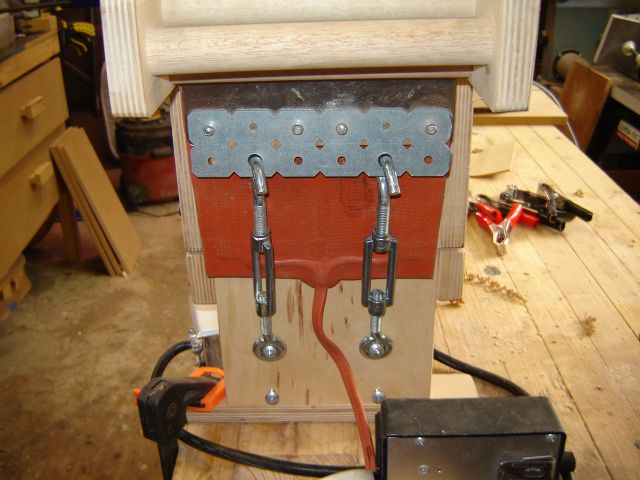
So load up your wood and heat blanket as usual. Locate your waist mark and when your wood is nice and hot, crank down the waist but not all the way. Then bend your lower and upper bouts as usual and connect your turnbuckles and secure them to the bender some how. I have rigged up different attachment points for each shape I use. You just need to make sure that the side follows the natural curve of the mold or you will put a kink in the side where it comes off the mold. If your molds are over size this may not be a problem. Its easy at the head end but harder at the tail where most of the difference seems to be. I just screwed a wood block to the end of the bender so I have attachment points.
Don't do the turnbuckles up too tight just yet but get them located. Now, crank the waist down all the way and the slats will pull up nice and tight. Lastly, just adjust your turnbuckles to take out any slack and you are done. You can put enormous pressure on the wood this way. The tension created by the top slat pulling everything down means there is nowhere for the side to go if it wants to ripple. Using the solid mold underneath has improved this system.
Cheers
Dom
First is a pic of the new solid bending form I made for an MJ. It uses the 4 off-cuts from the mold I made and I added strips of pine 1x2. I made the two halves and joined them afterwards because that was easy for me given my tools and i didn't want to cut up more mdf. But you could easily just make it out of 8 layers of mdf. I have made the form to over bend the side slightly.
My SS slats for bending are joined at the tail end and I added a galvanised strip between the two slats so the wood and blanket have room to slide all the way in. On the open end there is another gal strip only on the top slat. I have drilled holes in the gal strips so i can attach springs or turnbuckles.
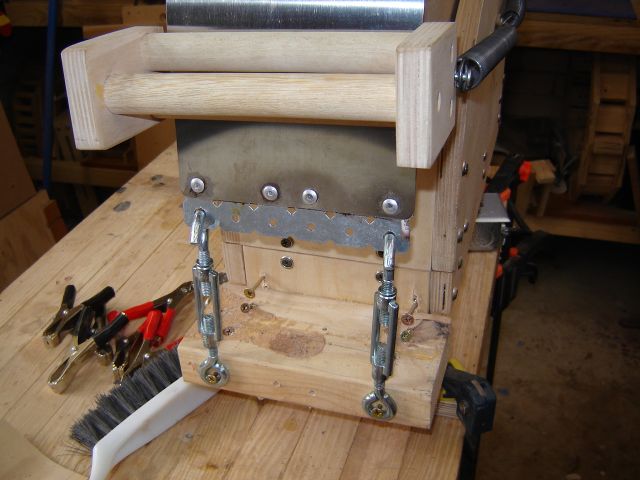
So load up your wood and heat blanket as usual. Locate your waist mark and when your wood is nice and hot, crank down the waist but not all the way. Then bend your lower and upper bouts as usual and connect your turnbuckles and secure them to the bender some how. I have rigged up different attachment points for each shape I use. You just need to make sure that the side follows the natural curve of the mold or you will put a kink in the side where it comes off the mold. If your molds are over size this may not be a problem. Its easy at the head end but harder at the tail where most of the difference seems to be. I just screwed a wood block to the end of the bender so I have attachment points.
Don't do the turnbuckles up too tight just yet but get them located. Now, crank the waist down all the way and the slats will pull up nice and tight. Lastly, just adjust your turnbuckles to take out any slack and you are done. You can put enormous pressure on the wood this way. The tension created by the top slat pulling everything down means there is nowhere for the side to go if it wants to ripple. Using the solid mold underneath has improved this system.
Cheers
Dom
You can bomb the world to pieces,
but you can't bomb the world to peace!
- TimS
- ANZLF Approved Supplier
- Posts: 210
- Joined: Thu Sep 27, 2007 8:16 pm
- Location: Perth, Western Australia
- Contact:
Hi Dominic,
Just an observation about the joining of the upper and lower steel sheets:
Have you made sure that there is a bit of relief at the end just in case the side material needs to moves towards the end a little when you complete the bend? I was thinking that the material might have a tendency to contort a little if you didn't.
In addition I usually determine the distance from the centre of the waist to the end the side at the lower bout so I can place a mark or indent the steel on its edge at that point which will line up with the centre of the waist on the mould. This invariably helps maintian symmetry of figure where the ends meet at the lower bout.
Please forgive if you have already addressed this issue!
Regards
Tim S
[url]http://www.australiantonewoods.com[/url]
Tim, not sure what you mean about relief. I use a side template. I cut my sides a bit over size and mark the waist. I have a mark on my slats and I line that up with the mark on my side and the gap in the bender where the waist crank goes. As I bend the side seems to stay referenced over the bottom slat and the top slat slides to complete the larger arc on the top. I think this is what you are referring to. You obviously have to work out where the waist should be relative to the end for your own designs but with my OM and Dread, a Hauser classical and the MJ shapes all work from the same waist line. Its just that the over hang is different for each one.
On thing to remember is that the slat will shrink a bit when it cools down and tighten things up even more. I have also used 2 strong strings at the tail end instead of the turnbuckle but that is harder to get lined up because you can't adjust them and there is not room for both.
Dom
On thing to remember is that the slat will shrink a bit when it cools down and tighten things up even more. I have also used 2 strong strings at the tail end instead of the turnbuckle but that is harder to get lined up because you can't adjust them and there is not room for both.
Dom
You can bomb the world to pieces,
but you can't bomb the world to peace!
Allen, I got my bender from blue creek in the end. The time I was spending trying to find things like screw clamps etc was adding up to nothing.
I get really frustrated with finding simple hardware in OZ. In lots of US woodwork mags (like ShopNotes) they have cool jigs that have screw clamps or heavy duty sliding runners for draws or other assorted cool stuff but you can't seem to get here. I even went to order some hardware from McMaster in the US after i saw a link on the OLF. They have tonnes of cool stuff. But they won't ship to Australia any more because of the stupid security laws. And I thought we were on the same side.
Dom
You can bomb the world to pieces,
but you can't bomb the world to peace!
- Bob Connor
- Admin
- Posts: 3126
- Joined: Mon Jul 09, 2007 9:43 pm
- Location: Geelong, Australia
- Contact:
- Dennis Leahy
- Blackwood
- Posts: 872
- Joined: Wed Oct 10, 2007 12:32 am
- Location: Duluth, MN, US
- Contact:
Well now that we have gone public. Bob, have you got that centrifuge going yet. We are all waiting for some more fissionable material.
Kim, we are doing a group buy for another load of aluminium tubes coming in from Africa next week. You in?
Oh, and I booked the Maralinga caravan park next month so we can all go do some testing. Don’t forget the esky.
Dom
Kim, we are doing a group buy for another load of aluminium tubes coming in from Africa next week. You in?
Oh, and I booked the Maralinga caravan park next month so we can all go do some testing. Don’t forget the esky.
Dom
You can bomb the world to pieces,
but you can't bomb the world to peace!
Sorry Dom,Dominic wrote: Kim, we are doing a group buy for another load of aluminium tubes coming in from Africa next week. You in? Dom
I'll give it a miss. I am moving away from nukes and on to Biological WMD's. So far my experiments have proven to be VERY promising and I shall be giving small random live demonstration in the tents at Maralinga so to assist be sure bring a gas mask and a couple of slabs of Coopers Sparkling Ale.
For the spectacular 'Open Air Demonstration' (now there's an oxymoron if I ever heard one) which is scheduled to take place on the Sunday after pack-up time when we all have our gear safely under cover, I will bringing out the bottles of highly volatile Home Brew made just for the occasion.
This should be great fun but I must remind everyone that there is to be absolutely NO SMOKING during and immediately after this demonstration.
Looking forward to see you all there
Cheers
Chemical Kim
- Bob Connor
- Admin
- Posts: 3126
- Joined: Mon Jul 09, 2007 9:43 pm
- Location: Geelong, Australia
- Contact:
- Bob Connor
- Admin
- Posts: 3126
- Joined: Mon Jul 09, 2007 9:43 pm
- Location: Geelong, Australia
- Contact:
- Dennis Leahy
- Blackwood
- Posts: 872
- Joined: Wed Oct 10, 2007 12:32 am
- Location: Duluth, MN, US
- Contact:
If there are any newbies reading this discussion, I have very little experience but I can add something not to do:
I think that it is a mistake to build your male bending mold narrower than 6", if you ever plan on using a silicone blanket and steel slats.
I took a guitarmaking class about 25 years ago, and in that class, the sides were steeped in boiling water, then quickly moved to a male mold and clamped down. It worked, but the system was designed before heating blankets. We made both male and female molds simultaneously by cutting through a stack of 5 pieces of MDF or plywood. As several folks here have mentioned, that should be 8 pieces of 3/4" material, totaling 6", so the heating blanket and especially the steel slats will not overhang the edges. That overhang causes problems when you try to clamp cauls onto the mold.
Here are a couple I have made, and you'll see the male mold is too narrow (female mold height is probably better kept around 4" to 5".)
Hope this helps to keep someone from making the same mistake as me.
Dennis
Last edited by Dennis Leahy on Mon Jul 07, 2008 2:48 am, edited 1 time in total.
Another damn Yank!
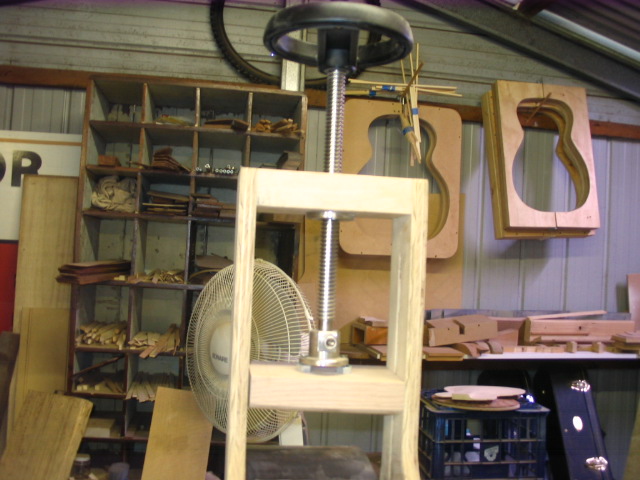
I'm in the process of building my bending form. Since I had a veneer press screw on hand, I'm using it for setting the waist caul. I don't remember which store I picked it up from, but two of the woodworking chain stores carry them, Rockler and Woodcraft.
Overall length is a foot, so I could get four, maybe six into an International Flat Rate box, which was $39 shipping the last time I shipped to Australia a month or so ago. If you want to do a group buy, let me know. I live fairly close to either store, though I do try to avoid going to them. The sofa just isn't as comfy as I thought it would be when I picked it out.
Lillian,
I'd be keen to buy one of the Rockler screws. If theres enough interest amongst forumites Id be willing to act as receiver and distributor of the goods here in Australia. Its probablly easiest for you if I make a single payment to you for the goods plus freight. Forumites can reimburse me and Ill take care of local freighting of the goods to final destinations.
Food for thought
Cheers Martin
- Bob Connor
- Admin
- Posts: 3126
- Joined: Mon Jul 09, 2007 9:43 pm
- Location: Geelong, Australia
- Contact:
I don't know if this is of use to anyone but McJing Tools (old Scots/Chinese firm ) sell a press screw for $10 but it's only 7.5".
McJing Tools
Might be useful for cutaways. I've got a couple and they seem OK. We've used them for a mando side bender.
But I'd be interested in one of the Rockler ones too.
McJing Tools
Might be useful for cutaways. I've got a couple and they seem OK. We've used them for a mando side bender.
But I'd be interested in one of the Rockler ones too.
- Kim Strode
- Blackwood
- Posts: 215
- Joined: Fri Oct 19, 2007 8:11 am
- Location: Daylesford Victoria, Australia
I'm guessing that I should be able to get 6 in a box, but I could be wrong I might be able to get 7. Its hard to guess it they will stack well enough to pack more into a box. There are two international flat rate boxes that I'm aware of, but Ill see if there is another size/shape.
I have tomorrow off, I could go down and see if they have a handful in the store and see how many I can get in a box.
Bending forms and mods
Guy's,
Check out the vice screws from Timbecon in Perth, I'm sure the tail vice screw is the same or adaptable. They have a web site
Cheers John
Check out the vice screws from Timbecon in Perth, I'm sure the tail vice screw is the same or adaptable. They have a web site
Cheers John
Who is online
Users browsing this forum: No registered users and 5 guests