Technique for tight joinery on banding and end wedges
-
Corky Long
- Wandoo
- Posts: 14
- Joined: Wed Apr 22, 2009 1:43 am
- Location: Mount Kisco, NY
Technique for tight joinery on banding and end wedges
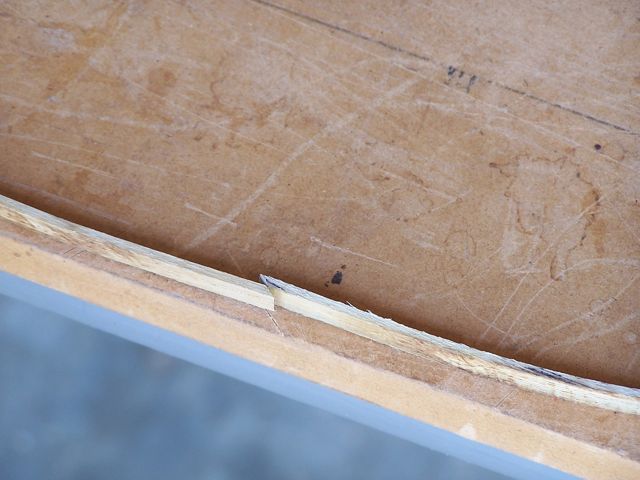
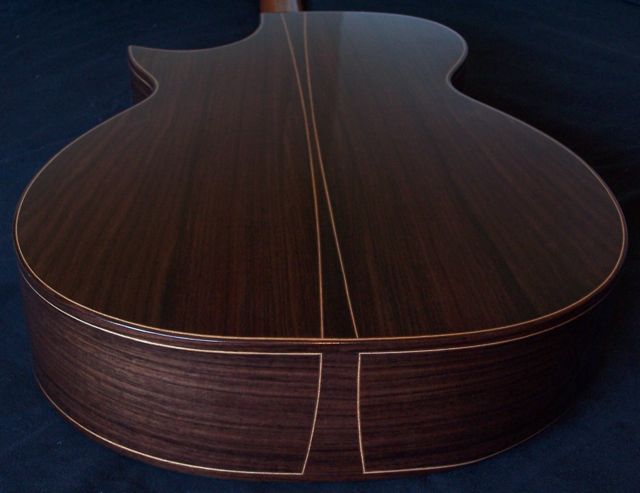
So I just looked - with admiration - at the end wedges that many of you have posted. I'm struggling with attaining those crisp tight joints where the banding ends meet. (Have a little noticeable gap that's always noticeable.)  What's the technique that you use to cut the end of the bankding so that it's just the right length and angle? I'd love to attain that "seamless look". Thanks!
Not entirely sure of your question Corky. But I'll try and answer my best.
For the end graft, I inlay them before the binding ledges are routed. Then cut for the linings all the way around the guitar.
If you plan on using purflings (those b/w/b lines or variations sometimes seen between linings and body), then you'll need to route a little deeper everywhere except at the end graft. I carefully sneak up to the end graft, but clean up the last little bit with a very sharp chisel. Usually the join is at 45 degrees, so is you have the back of your chisel polished up a bit like a mirror, it's easy to see the angle that you are going to cut by the reflection as you rotate the chisel a little one way or the other.
Bindings on the top are easy, as you don't have to worry about getting a seamless joint at the neck, but the back is a different matter. I use a scarf joint on the seam at the butt. I have my pre-bent bindings an set them down on my work bench as they would be glued to the instrument, with just a little overlap at the joining area at the butt. Then just by eye cut a scarf joint through both pieces at the same time. This way angle of the cut is complimentary on both pieces and they match up perfectly.

As far as the purflings go, you can do them seferately, or have them glued to the bindings. I've done them both ways, and prefer them glued to the bindings. To get the miter just right were it meets up to those on the end graft is pretty fiddly, but you just mark it and keep trimming it until its right.

Now, on the back I always do the joint at the butt first. It's the most visible, then when it comes to the joint a the neck, it just a lot of dry runs taping bindings in place and trimming the length until it's as good as it can be. Then gluing in place. Usually the heel cap us going to either fully, or almost cover the side of the binding, and you only see the 2 mm wide section looking down on it from the back, so you still have to get it close, but at least if it's a little off, it's not the first thing that you see.
Hope that helps, and makes sense.
For the end graft, I inlay them before the binding ledges are routed. Then cut for the linings all the way around the guitar.
If you plan on using purflings (those b/w/b lines or variations sometimes seen between linings and body), then you'll need to route a little deeper everywhere except at the end graft. I carefully sneak up to the end graft, but clean up the last little bit with a very sharp chisel. Usually the join is at 45 degrees, so is you have the back of your chisel polished up a bit like a mirror, it's easy to see the angle that you are going to cut by the reflection as you rotate the chisel a little one way or the other.
Bindings on the top are easy, as you don't have to worry about getting a seamless joint at the neck, but the back is a different matter. I use a scarf joint on the seam at the butt. I have my pre-bent bindings an set them down on my work bench as they would be glued to the instrument, with just a little overlap at the joining area at the butt. Then just by eye cut a scarf joint through both pieces at the same time. This way angle of the cut is complimentary on both pieces and they match up perfectly.

As far as the purflings go, you can do them seferately, or have them glued to the bindings. I've done them both ways, and prefer them glued to the bindings. To get the miter just right were it meets up to those on the end graft is pretty fiddly, but you just mark it and keep trimming it until its right.

Now, on the back I always do the joint at the butt first. It's the most visible, then when it comes to the joint a the neck, it just a lot of dry runs taping bindings in place and trimming the length until it's as good as it can be. Then gluing in place. Usually the heel cap us going to either fully, or almost cover the side of the binding, and you only see the 2 mm wide section looking down on it from the back, so you still have to get it close, but at least if it's a little off, it's not the first thing that you see.
Hope that helps, and makes sense.
Last edited by Allen on Fri Jun 26, 2009 5:20 am, edited 1 time in total.
- woodrat
- Blackwood
- Posts: 1154
- Joined: Tue Nov 25, 2008 6:31 am
- Location: Hastings River, NSW.
- Contact:
One technique that you may find helpful too when you are doing the end graft is plane or sand it the barest possible amount out of square so that it is wedging in from the top and you get a nice tight line on the top surface against the end grain of the sides. Prepare the joint line at the end of the sides first making sure that they are straight and true to produce your cavity that the end graft will fill. .I find that this is a good technique for success. Remember we are only talking the barest part of a degree out of square. I hope that you find this helpful.
"It's never too late to be what you might have been " - George Eliot
-
Corky Long
- Wandoo
- Posts: 14
- Joined: Wed Apr 22, 2009 1:43 am
- Location: Mount Kisco, NY
- woodrat
- Blackwood
- Posts: 1154
- Joined: Tue Nov 25, 2008 6:31 am
- Location: Hastings River, NSW.
- Contact:
Hi Corky, Try a couple of practice pieces inlaying with the slightly out of square technique to get the feel for it, It is very subtle. It is something that you develop a feel for. Also because the piece that you are inlaying is tapered you can sneak up on the fit by working mainly on one side of the wedge to finesse the fit. As you are fitting it then the wedge just goes further into the area to be inlaid so there is a good deal of "travel" there to get the edges tight, which is what your after.Corky Long wrote:Thanks very much ! Both helpful suggestions - appreciate your taking the time - I'll let you know how it progresses.
Happy End Grafting.
"It's never too late to be what you might have been " - George Eliot
Who is online
Users browsing this forum: Google and 29 guests